Outcome: By following this guide, Indiana homeowners can accurately assess and upgrade attic insulation to R-49–R-60, reducing heating and cooling costs by up to 15%. Timeframe: 2–4 hours for assessment; 1–2 days for full installation. Skill level: Beginner (assessment) to Intermediate (DIY installation).
Indiana sits in Climate Zone 5 under the IECC (International Energy Conservation Code), which mandates specific attic insulation R-values to withstand cold winters and humid summers. The Department of Energy (DOE) recommends R-49 to R-60 for attics in this zone. Most existing Indiana homes fall short, with average attic R-values between R-19 and R-30, according to ENERGY STAR assessments (2024). R-value measures a material’s resistance to heat flow; higher numbers mean better insulating performance per inch of thickness.
Before You Begin: Prerequisites Checklist
- Tools needed: tape measure, flashlight, ruler, camera/phone, dust mask, gloves, stud finder (to locate joists in finished attics)
- Safety gear: N95 mask, long sleeves, protective eyewear, knee pads (especially for fiberglass insulation, which can irritate skin and lungs)
- Access: Confirm attic access point and stable footing (attic joists, not drywall); use plywood boards to distribute weight if the attic lacks a permanent floor
- Time commitment: 30 minutes for inspection; 4–8 hours for DIY insulation upgrade on an average 1,200–1,500 sq ft attic
- Optional: Schedule a professional home energy audit before starting (recommended for accuracy); a blower door test can reveal air leakage rates in air changes per hour (ACH)
- Budget range: Expect $1,500–$4,500 for a full attic insulation upgrade in a typical Indiana home, depending on square footage and material choice
Step 1: Check Your Current Attic Insulation Levels
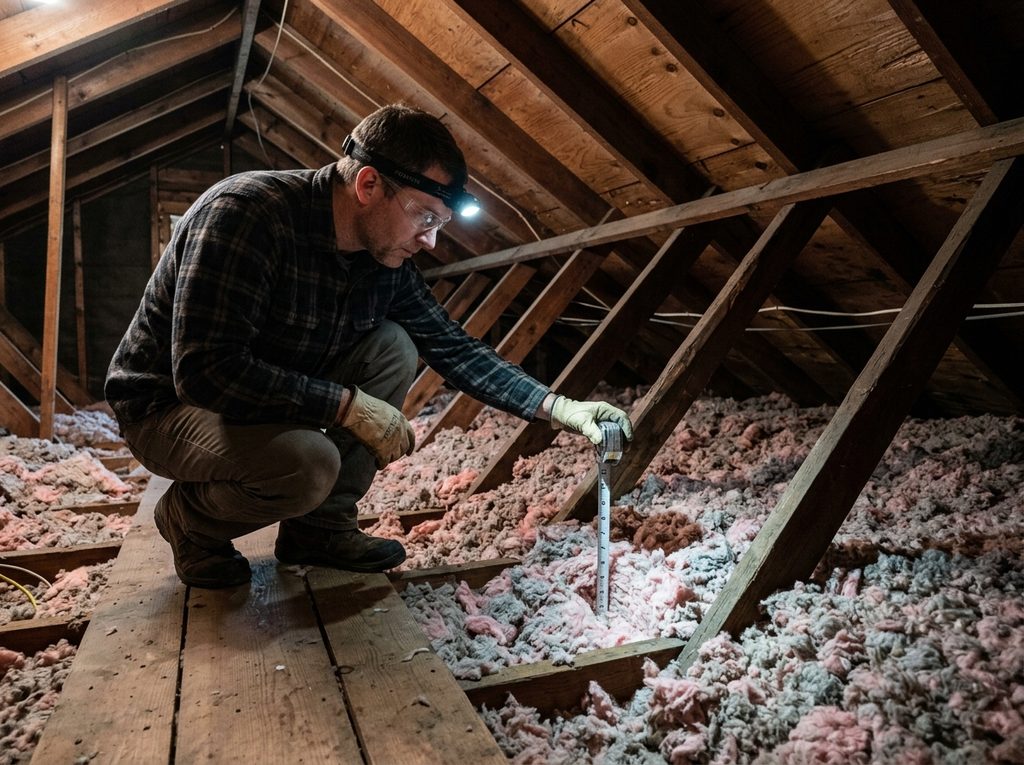
Measure existing insulation depth using a tape measure or ruler at multiple points across the attic floor.
Sub-steps:
- Access the attic through the designated hatch or pull-down stairs.
- Measure insulation depth in at least 4–5 different spots, including corners and areas near the eaves, since depth often varies across the same attic.
- Note the insulation type (fiberglass insulation, cellulose insulation, or batt insulation) by checking color, texture, and whether it’s loose-fill or in rolled sheets.
- Photograph any visible gaps, compression, or moisture stains for reference when comparing bids or planning your upgrade.
- Record the average depth in inches, then multiply by the material’s R-value per inch to estimate your current total R-value.
Signs your attic needs more insulation include uneven snow melt on the roof, ice dams, cold floors below the attic, drafty rooms, and rising energy bills during winter and summer months. A quick rule of thumb: if you can see the tops of your attic joists poking through the insulation, you likely have less than R-30 and need an upgrade.
Step 2: Understand Indiana’s Recommended R-Value for Attics
The recommended R-value for attics in Indiana ranges from R-49 to R-60, per DOE and IECC Climate Zone 5 guidelines. This range applies to most single-family homes, townhomes, and manufactured housing across the state, from Indianapolis to Fort Wayne to Evansville.
Insulation R-Value Chart by Climate Zone
| Climate Zone | Recommended Attic R-Value | Typical Region |
|---|---|---|
| Zone 3 | R-30 to R-49 | Southern U.S. |
| Zone 4 | R-38 to R-49 | Mid-Atlantic |
| Zone 5 (Indiana) | R-49 to R-60 | Midwest, including Indiana |
| Zone 6 | R-49 to R-60 | Northern states |
Indiana building codes reference IECC 2021 standards, enforced locally alongside guidance from the Indiana Housing and Community Development Authority. New construction permits typically require proof of attic insulation meeting or exceeding R-49; existing homes are not legally required to retrofit but qualify for rebates when upgraded to code-minimum levels.
Step 3: Choose the Best Insulation for Indiana Attics
Compare insulation types and R-values to select the best option for your budget, attic structure, and moisture concerns.
Insulation Material Comparison
| Type | R-Value per Inch | Best Use Case | Cost per Sq Ft |
|---|---|---|---|
| Fiberglass batt insulation | R-2.9 to R-3.8 | DIY installs, standard joist spacing | $0.64–$1.19 |
| Blown-in cellulose insulation | R-3.2 to R-3.8 | Irregular attics, retrofits | $1.00–$1.50 |
| Spray foam insulation | R-6.0 to R-6.5 | Air sealing + insulating combo | $1.50–$3.00 |
| Blown-in insulation (fiberglass) | R-2.5 to R-3.7 | Fast coverage, uneven surfaces | $1.00–$1.50 |
For Indiana’s Climate Zone 5, cellulose insulation and spray foam insulation offer strong moisture resistance, an important factor given the state’s humid summers. Cellulose is made from recycled paper treated with fire retardant, making it a budget-friendly, eco-conscious choice for retrofits. Spray foam costs more upfront but doubles as an air sealant, often eliminating the need for a separate air-sealing step. Fiberglass batts remain the most common DIY option because they require no special equipment, though they perform worse than loose-fill materials in irregularly shaped attics with numerous obstructions.
Step 4: Perform Attic Air Sealing Before Insulating
Air sealing prevents conditioned air from escaping through gaps, which improves insulation performance by up to 20%, according to ENERGY STAR (2024).
Attic Air Sealing Techniques:
- Seal gaps around recessed lighting, plumbing stacks, and electrical wiring using fire-rated caulk or foam sealant rated for attic temperatures.
- Caulk small cracks (under 1/4 inch); use expanding spray foam for larger gaps (1/4 inch to 3 inches).
- Weather-strip the attic hatch or access door and add a rigid foam insulation cover if the hatch is uninsulated.
- Inspect the roof deck for daylight gaps, water damage, or nail pops that indicate roof leaks needing separate repair.
- Seal the top plates of interior walls where they meet the attic floor, a commonly overlooked leakage point.
Skipping this step is one of the most common reasons insulation underperforms, even at correct R-value levels. Air sealing alone typically costs $350–$700 for a professional service, or under $100 in materials for a DIY approach using caulk guns and foam sealant cans.
Step 5: Calculate the Insulation Depth You Need
Attic insulation thickness varies by material. Use this insulation depth guide to reach R-49–R-60 in Indiana homes.
Attic Insulation Thickness Chart
| Insulation Type | Depth for R-49 | Depth for R-60 |
|---|---|---|
| Fiberglass batt | 13–17 inches | 16–21 inches |
| Blown cellulose | 13–14 inches | 16–17 inches |
| Spray foam (closed-cell) | 7–8 inches | 9–10 inches |
If your current insulation measures less than 10 inches, you likely need an attic insulation upgrade to meet Indiana home insulation requirements 2024. To calculate added depth needed, subtract your current depth from the target depth for your chosen material; for example, an attic with 6 inches of fiberglass batt (roughly R-19) needs an additional 7–11 inches to reach R-49. When layering new insulation over old, run new batts perpendicular to existing rows to minimize gaps at the seams.
Step 6: Install Insulation or Hire a Contractor
Decide between a DIY attic insulation installation guide approach or hiring a licensed insulation contractor.
DIY Installation Steps:
- Lay batt insulation perpendicular to existing layers to cover joists and minimize thermal bridging.
- For blown-in insulation, rent or borrow a blowing machine from suppliers such as home improvement stores, which often include the machine free with material purchase.
- Maintain consistent depth across the entire attic floor using depth markers or rulers placed every few feet.
- Avoid compressing insulation, which reduces R-value effectiveness; batts should sit loosely between joists, not stuffed tightly.
- Wear a respirator and work during cooler parts of the day, since attics can exceed 120°F in summer.
For homes with knob-and-tube wiring, extensive mold, or complex rooflines, hire a professional. DIY installation typically saves 40–60% compared to professional labor costs, but professional installs include warranties and code-compliance guarantees. Search “insulation contractor near me” and verify licensing with the state before booking; request at least three quotes and confirm each bid specifies material type, target R-value, and total square footage covered. Homeowners can also consult resources like Indiana attic insulation R-value guidelines to confirm project specifications before hiring.
Step 7: Verify Attic Ventilation and Moisture Control
Proper attic ventilation prevents moisture buildup, which can degrade insulation and cause mold.
- Confirm soffit vents are unobstructed by insulation; install baffles (rafter vents) to maintain airflow from the eaves to the ridge.
- Install a vapor barrier on the warm side of insulation in cold climates like Indiana, typically facing the living space below.
- Check for balanced intake (soffit) and exhaust (ridge or gable) ventilation, targeting 1 square foot of net free vent area per 300 square feet of attic floor, per DOE guidance.
- Inspect the roof deck annually for condensation or staining, which signals inadequate ventilation or a failed vapor barrier.
- Avoid blocking gable or ridge vents with insulation, insulation bags, or stored items.
Attic moisture control is critical in Indiana due to seasonal humidity swings between summer and winter. Poor ventilation combined with high insulation levels can trap moisture, leading to wood rot in roof decking and reduced insulation lifespan.
Troubleshooting Common Attic Insulation Issues
| Problem | Solution |
|---|---|
| Insulation is compressed or matted | Remove and replace with fresh batt or blown-in insulation |
| Ice dams forming on roof edges | Improve air sealing and increase attic ventilation |
| High heating and cooling costs persist after upgrade | Schedule a home energy audit to check for hidden air leaks |
| Insulation R-value below Indiana code | Add blown-in insulation on top of existing batt insulation |
| Signs of moisture or mold | Inspect vapor barrier and soffit vents before adding insulation |
| Uneven room temperatures between floors | Check for insulation gaps near attic knee walls and floor joists |
| Pest droppings or nesting material in insulation | Remove contaminated insulation, seal entry points, then re-insulate |
Next Steps: Maximize Energy Efficiency and Savings
After completing your attic insulation upgrade, take these next steps:
- Apply for energy efficiency rebate programs through Indiana utility providers, including Duke Energy Indiana, NIPSCO, AEP Indiana Michigan Power, and Indianapolis Power & Light, which often offer $0.15–$0.20 per square foot in insulation rebates.
- Check eligibility for the federal Weatherization Assistance Program if income-qualified, which can cover the full cost of attic insulation for low-income households.
- Claim the federal 25C Energy Efficient Home Improvement Tax Credit, covering up to 30% of insulation material costs (capped at $1,200 annually) through 2032.
- Schedule a follow-up home energy audit within 12 months to confirm performance and verify R-value targets were met.
- Inspect your HVAC system filters and ductwork, since improved insulation reduces system strain and may allow for smaller equipment on future replacements.
- Perform annual attic insulation maintenance, checking for pest damage, settling, or moisture intrusion each fall before heating season begins.
Proper attic insulation is one of the highest-ROI home weatherization tips available to Indiana homeowners, often paying for itself within 3–5 years through reduced heating and cooling costs.